This tutorial will teach you how to create a simple WordPress header in Photoshop.
Step 1 – Finding the right image resolution
The first thing you need to figure out, is what pixel resolution your header image shall have.
The resolution varies depending on your WordPress template.
To find out what size is right for you,
click on the Apperance button in the left side menu.
Then click on the sub menu called Header.
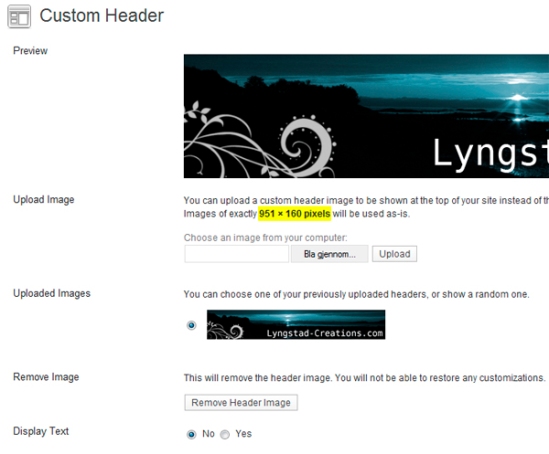
This is the Custom Header page.Here you can change your header settings,
and also upload your finished header later on.
Notice the text written in bold characters in the Upload image section. In this case it’s 951 x 160 pixels.
This is the image resolution you should specify in Photoshop.
Step 2 – Designing your header in Photoshop
Open Photoshop.
Click File > New to create a new document.
Here you can specify your documents width and height.
In my case it’s 951 by 160 pixels. Click “OK” to create your new document.
Now that we’ve created our document, it’s time to type in some text in our header.
I named mine “The Busy Bee Blog”.
Step 3 – Finding stock footage / importing photo’s
Let’s put an image into the header. Google’s Image search works fine.
(Make sure you don’t violate any copyright laws).
I googled “bee white background”.
When you find an image you like, right click on it and select “copy image”.
Go back in to Photoshop and paste it. (Edit>Paste or Ctrl + V)
![]() To move your pasted image use the move tool.
To move your pasted image use the move tool.
I placed my bee in the right corner.
This itself is a clean and nice header.
But for those who want to sprite it up a bit, you should continue reading.
Step 4 – Desaturating and adjusting Hue/Saturation
The next step is to desaturate the image.
(To make the bee greyscale)
Go to Image > Adjustments >Desaturate (or push Shift + Ctrl + U)

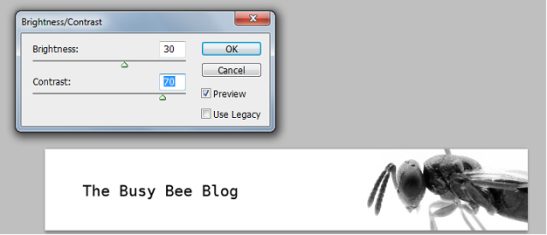
To give the bee a more dramatic effect later on, I’d like to adjust the brightness and contrast
levels of the image.
Go to Image>Adjustments>Brightness/Contrast .
The next step is to give this header some color.
Create a new layer (Shift + Ctrl +N) . And name it “clouds”.
Make sure your new layer lies below your bee layer in the layer panel.

With your front and background color set to black and white,
you are ready to render some clouds.
Go to Filter>Render>Clouds.
With the clouds rendered, we notice that the bee has got a ugly white box around it.
That’s because the image I’ve found on the web had a white background.
Luckily for us, a solid color background is easy to remove.
![]() Bring up the “Magic Wand” tool.
Bring up the “Magic Wand” tool.
Click on the white areas around the bee, and delete them (Hit the“DEL” or “Backspace” key)
Voilla, the white box is gone.
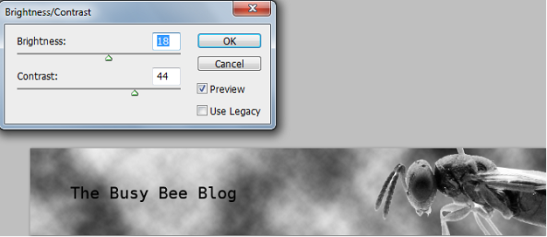
Now lets give our “clouds” layer a little more contrast.
Select the “clouds” layer from the layers panel.
Go to Image >Adjust > Brigtness/Contrast, and adjust the sliders.
Time to add some distortion to the clouds layer. The Wave filter will do just fine.
Go to Filter >Distort>Wave
Play around with the parameters until you’re satisfied.
Now it’s time to colorize the clouds layer.
Go to Image > Adjustments > Hue / Saturation .
Make shure you check the colorize checkbox.
Slide the hue slider until you get the color you want. You can also adjust the saturation and the lightness of the color.
To make the bee blend into the background, we will change the layers blend mode.
 Select your bee layer.
Click on the drop down menu as shown on the image,
and select the blending mode named “Luminosity”.
Well, I’ve shown you the basics, now it’s time to play around with this technique,
if you have any questions / results, dont hesitate to reply =)
Below you can see my final result.
I’ve changed my text color to white and given it a black stroke, so that it stands more out from the background.
Have fun!


