Swapping faces

This tutorial will show you an easy way of swapping faces of two people in Photoshop, making them blend together into a totally new person.

So for this tutorial, I´ll start of with finding two people who I know might blend well together.

Merging Barack Obama and Will Smith in Photoshop

Will Smith and Barack Obama is an easy fix. They both got the same skin tone,
and there’s no need to swap ears 😉

It is very important that the faces you pick are shot in the same angle, otherwise it will look quite unnatural 😉
The lighting in the images should also resemble each other, this will make the task of making your images blend much easier.

Ok, so now that you´ve found your two images, it´s time to do some cutting and pasting.

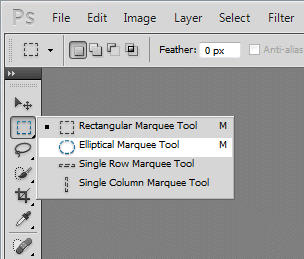
Select the “elliptical marquee tool” from the Tools bar.

Will Smiths face selected with the elliptical marquee tool

Click and drag to make a selection of your subjects face.

To copy your selection to the clipboard, press cmd + c (ctrl+ c if on a pc).
Now it’s time to go on over to your second picture, the one of which you shall paste the face upon.

To paste your selection, press cmd + v (ctrl + v if on pc)

Now it’s time for some adjustments.

Go to the layers panel, and adjust the opacity of the face layer down to about 50 – 60%.

Now that your face-layer is transparent, you can align the face with the underlying image,
by matching the alignment and size of the eyes of both layers.

Now adjust the layer transparency back to 100%  to see how that worked out for you.

Notice you have a lot of areas that needs to be removed to make the face blend more in to the underlying layer.

Select the eraser tool  and choose a large soft brush.
Erase the parts of the image that does not need to be there.

Make sure you soften your edges,and avoid sharp edges like in this picture.
Sharp and choppy edges makes it very easy to point out as a sloppy Photoshop job.

To make the image blend even more with the underlying layer, it´s important to match the skin tones as accurately as you can.
Go to Image > Adjustments >Hue/Saturation .

Make sure the preview box is checked.
Now adjust your slider until you get the results you would like to see.

If your face layer needs to be brighter or darker, go to Image > Adjustments>Brightness/Contrast.

Below is my final result 🙂

Photoshopped image

Can you do it? YES YOU CAN 😉

Photoshop zombies for dummies

In this tutorial i will show you how to turn a cute and innocent girl, into a rotting zombie child, using only the magic of Photoshop.

1. Getting started

Starting out

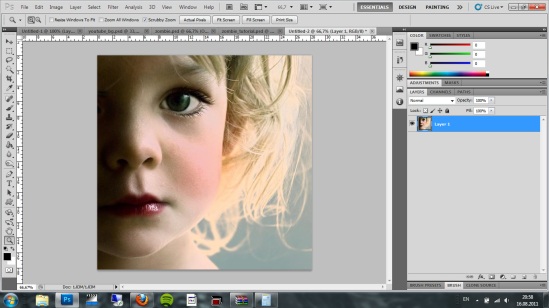
This is my zombie candidate. Go ahead and duplicate this layer by going to Layer >Duplicate.
Name the new layer “zombie skin”.

2. Adjust Hue/Saturation
Select your “zombie skin” layer.

Go to Image>Adjustments>Hue/Saturation (or press Ctrl + U)
Fill in the values from the screenshot above.

3. Making the creepy eye

Mask out the eye using the lasso tool (press “L” on your keyboard).
Copy the eye and paste it into a new layer (Ctrl + C and then Ctrl + V)
Rename the layer to  “zombie eye”

To turn the eye yellow go to Image>Adjustments>Hue/Saturation (or press Ctrl + U)

Fill in the values from the screenshot above.

4. Bruising the face

Duplicate the “zombie skin” layer and name the duplicated layer “zombie bruises”
Select the burn tool (press “O” on your keyboard)

Draw on some bruises underneath the eyes and on the chin.

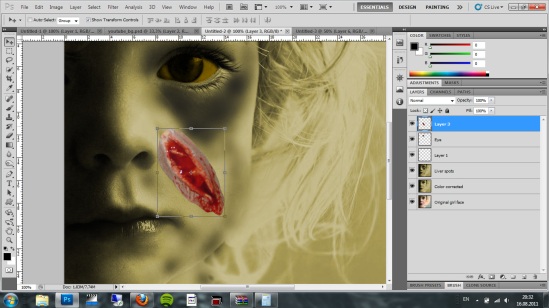
5. Adding a flesh wound

Go online and find an image of a flesh wound.
Google searches like “flesh wound makeup” gives great looking gashes.
Paste your flesh wound image into your Photoshop project and name the layer “zombie flesh wound”.


Select the lasso tool and draw a selection around the parts of the wound you would like to use.
To remove the unnecessary parts of the image go to Select>Inverse (Shift+Ctrl +I) and hit delete/backspace on your keyboard.

Now desaturate your flesh wound. Go to Image>Adjustments >Desaturate (Shift+Ctrl+U)


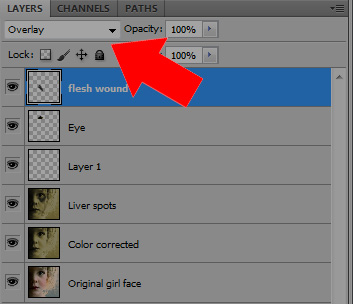
Change the “zombie flesh wound” layer’s blending mode to “Overlay”

To make the flesh wound more visible, adjust the brightness and contrast of the layer.

Go to Image>Adjustments>Brightness/Contrast.


Fill in the values from the screenshot above.

6. Bring on the maggots

No zombie is complete without a nasty maggot crawling in his/hers (it’s?) wounds.
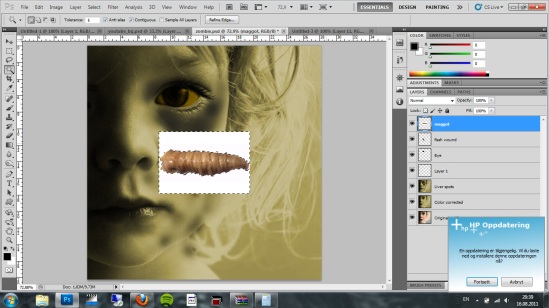
Go online and find a bug of your choice. I’ve chosen the maggot.

Paste the maggot into your Photoshop project and name the layer “maggot”

Cut away the white backdrop using the magic wand tool.

Erase the left over white outline surrounding the maggot using the eraser tool (press “E” on your keyboard)

Move the maggot to your desired position using the Move tool (press “V” on your keyboard)

Now adjust the Hue/Saturation of your maggot layer.

Go to Image >Adjustments >Hue/Saturation (or press Ctrl + U)
Fill in the values from the screenshot above.

To make the maggot blend more into the image, you need to light it properly.
Take a look at your original image. Notice the angle of the light and how the shadows fall in the girls face.

Select the maggot layer. click on the fx button (located in the layer panels lower left corner) and select “Inner Shadow”.


Use the values from the screenshot above.

7. Rotten skin

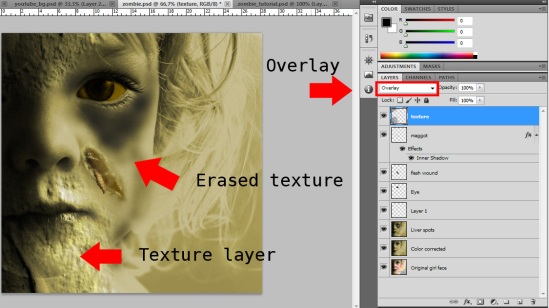
So, her skin is to smooth, for a rotting zombie that is. We need to give her face more texture.
Do a google search for “bumpy texture”.


Paste the texture into your Photoshop project and name the layer “rotting skin”.


Set the layer’s blending mode to “Overlay”.
Use the eraser tool to remove rotting skin from spots where it’s not supposed to be.

8. Finished

Here is my finished result.

Now go ahead and make your Facebook friends ready for the zombie apocalypse !

Designing your wordpress header in Photoshop

This tutorial will teach you how to create a simple WordPress header in Photoshop.

Step 1 – Finding the right image resolution

The first thing you need to figure out, is what pixel resolution your header image shall have.
The resolution varies depending on your WordPress template.

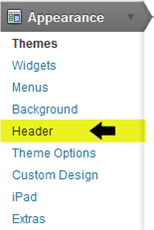
Apperance Menu

To find out what size is right for you,
click on the Apperance button in the left side menu.
Then click on the sub menu called Header.

This is the Custom Header page.Here you can change your header settings,
and also upload your finished header later on.


Notice the text written in bold characters in the Upload image section. In this case it’s 951 x 160 pixels.
This is the image resolution you should specify in Photoshop.

  Step 2 – Designing your header in Photoshop

Open Photoshop.
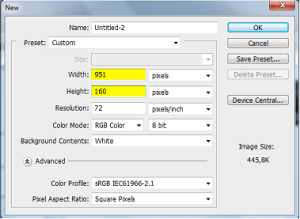
Click File > New to create a new document.

Here you can specify your documents width and height.
In my case it’s 951 by 160 pixels. Click “OK” to create your new document.

Now that we’ve created our document, it’s time to type in some text in our header.

   Select the Type tool
and click anywhere in your document canvas to start typing.


I named mine “The Busy Bee Blog”.

Step 3 – Finding stock footage / importing photo’s

Let’s put an image into the header. Google’s Image search works fine.
(Make sure you don’t violate any copyright laws).

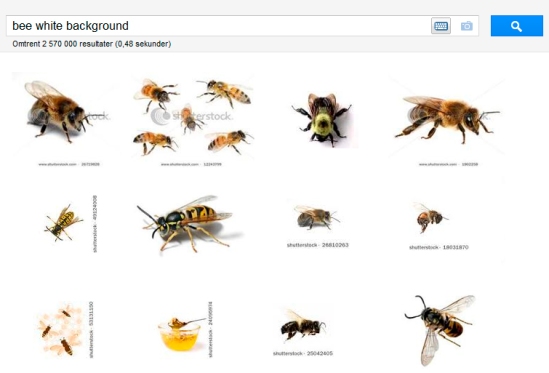
Google bee search

I googled “bee white background”.

When you  find an image you like, right click on it and select “copy image”.
Go back in to Photoshop and paste it. (Edit>Paste or Ctrl + V)

White bee header

Move tool icon  To move your pasted image use the move tool.
I placed my bee in the right corner.

This itself is a clean and nice header.
But for those who want to sprite it up a bit, you should continue reading.

Step 4 –  Desaturating and adjusting Hue/Saturation

The next step is to desaturate the image.
(To make the bee greyscale)

Go to Image > Adjustments >Desaturate (or push Shift + Ctrl + U)

Greyscale bee header

To give the bee a more dramatic effect later on, I’d like to adjust the brightness and contrast
levels of the image.

Go to Image>Adjustments>Brightness/Contrast .

Adjusting the brightness and contrast

The next step is to give this header some color.

Create a new layer (Shift + Ctrl +N) . And name it “clouds”.
Make sure your new layer lies below your bee layer in the layer panel.

Foreground and background color
With your front and background color set to black and white,
you are ready to render some clouds.
Go to Filter>Render>Clouds.

Rendered clouds

With the clouds rendered, we notice that the bee has got a ugly white box around it.
That’s because the image I’ve found on the web had a white background.
Luckily for us, a solid color background is easy to remove.

Photoshop magic wand   Bring up the “Magic Wand” tool.
Click on the white areas around the bee, and delete them (Hit the“DEL” or “Backspace” key)

Clouds and no white box

Voilla, the white box is gone.

Now lets give our “clouds” layer a little more contrast.
Select the “clouds” layer from the layers panel.
Go to Image >Adjust > Brigtness/Contrast, and adjust the sliders.

Header contrast

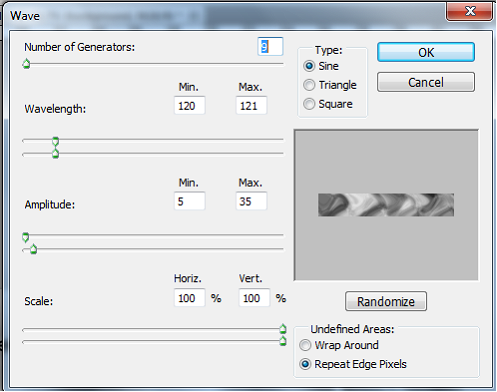
Time to add some distortion to the clouds layer. The Wave filter will do just fine.
Go to  Filter >Distort>Wave

Wave filter

Play around with the parameters until you’re satisfied.

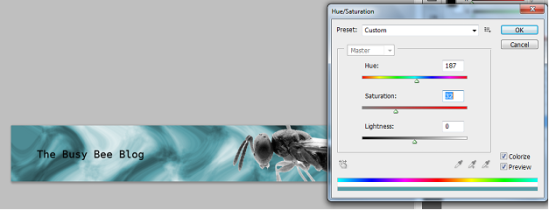
Now it’s time to colorize the clouds layer.

Go to Image > Adjustments > Hue / Saturation .

Hue saturation

Make shure you check the colorize checkbox.
Slide the hue slider until you get the color you want. You can also adjust the saturation and the lightness of the color.

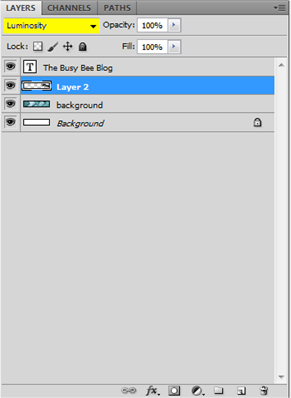
To make the bee blend into the background, we will change the layers blend mode.

Layer blend modeSelect your bee layer.
Click on the drop down menu as shown on the image,
and select the blending mode named “Luminosity”.

Well, I’ve shown you the basics, now it’s time to play around with this technique,
if you have any questions / results, dont hesitate to reply =)

Below you can see my final result.

Final result

I’ve changed my text color to white and given it a black stroke, so that it stands more out from the background.

Have fun!